
Python作为一种高级编程语言,使用广泛,其强大的功能和易学易用的特点,使其成为了许多开发者的首选语言。然而,Python并不是一种本地支持的编程语言,这也就意味着Python代码无法直接在移动设备上运行。因此,如果我们想要将Python应用程序打包成Android APK文件,就需要使用一些特殊的工具。
Python打包成APK的原理
在将Python应用程序打包成APK文件之前,我们需要了解一些基本的原理。首先,Python应用程序需要在Android设备上运行,我们需要将Python解释器嵌入到APK文件中。其次,我们需要将Python代码转换为可执行文件,这通常是通过将Python代码编译为C语言代码,然后再将其编译为Android平台上的本地库来实现的。最后,我们需要使用一些特殊的工具,如Buildozer或Kivy等来完成APK文件的构建和打包。
Python打包成APK的详细介绍
下面,我们将详细介绍如何将Python应用程序打包成Android APK文件。
第一步:安装Python-for-Android
Python-for-Android是一个用于打包Python应用程序的工具,它可以将Python解释器和Python代码转换为本地库。我们需要在本地计算机上安装Python-for-Android,以便在构建APK文件时使用。
在Linux或Mac OS X上,我们可以使用以下命令来安装Python-for-Android:
```
$ sudo apt-get update
$ sudo apt-get install python-for-android
```
在Windows上,我们可以从Python-for-Android的官方网站(https://github.com/kivy/python-for-android)下载并安装Windows版本。
第二步:编写Python代码
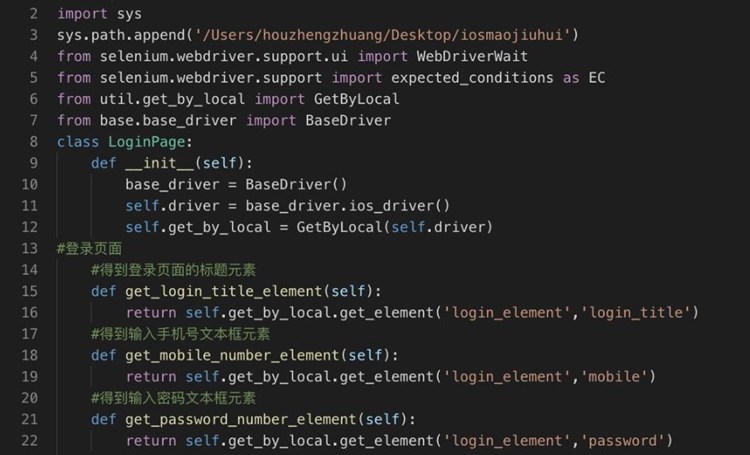
在将Python应用程序打包成APK文件之前,我们需要编写Python代码。这里我们以一个简单的Python应用程序为例:
```
import kivy
from kivy.app import App
from kivy.uix.label import Label
class MyApp(App):
def build(self):
return Label(text='Hello World')
if __name__ == '__main__':
MyApp().run()
```
这是一个使用Kivy框架编写的简单的Python应用程序,它将在Android设备上显示“Hello World”文本。
第三步:构建APK文件
我们可以使用Buildozer或Kivy工具来构建APK文件。这里我们以Buildozer为例。
首先,我们需要在项目根目录下创建一个名为buildozer.spec的文件,该文件将包含打包APK所需的所有信息,例如应用程序名称、版本号、包名、依赖项等等。
以下是一个示例buildozer.spec文件:
```
[app]
# (str) Title of your application
title = My Application
# (str) Package name
package.name = myapp
# (str) Package domain (needed for android/ios packaging)
package.domain = org.mydomain
# (str) Source code where the main.py live
source.dir = .
# (str) Application versioning (method 1)
version = 0.1
# (str) Application versioning (method 2)
version.regex = __version__ = ['"](.*)['"]
version.filename = %(source.dir)s/main.py
# (list) Application requirements
requirements = kivy
[buildozer]
# (int) Log level (0 = error only, 1 = info, 2 = debug (with command output))
log_level = 2
# (str) Path to build artifact storage, absolute or relative to spec file
# build_dir = ./.buildozer
# (str) Path to build output (i.e. .apk, .ipa) storage
# bin_dir = ./bin
# (int) Target Android API, should be as high as possible.
# android.api = 27
# (int) Minimum API your APK will support.
# android.minapi = 21
# (int) Android SDK version to use
# android.sdk = 20
# (str) Android NDK version to use
# android.ndk = r9c
# (str) Android NDK directory (if empty, it will be automatically downloaded.)
# android.ndk_path =
# (str) Python for android distribution to use, defaults to python2
# p4a.dist_name = python3crystax
# (str) ndk platform to use (auto, android-ndk-r9c, android-ndk-r10e, …)
# android.ndk_platform = android-21
# (str) Options to pass to android compilation (debug, release, …)
# android.build_mode = debug
# (list) Application permissions
# android.permissions = INTERNET
# (str) Android logcat filters to use
# android.logcat_filters = *:S python:D
# (bool) Copy library instead of making a libpymodules.so
# android.copy_libs = 1
# (str) The Android arch to build for, choices: armeabi-v7a, arm64-v8a, x86, x86_64
# arch = armeabi-v7a
# (str) Path to a custom AndroidManifest.xml, relative to the buildozer.spec file
# android.manifest.filename = ./AndroidManifest.xml
# (str) Extra Java compile options
# android.javac_options =
# (str) Extra dex options
# android.dex_options =
# (bool) Whether to enable the with_ads (admob) directive
# android.with_ads = 0
# (bool) Whether to enable the with_billing directive
# android.with_billing = 0
# (bool) Whether to enable the with_pygame_sdl2 directive
# android.with_pygame_sdl2 = 0
# (bool) Whether to enable the with_recipe directive
# android.with_recipe = 0
# (str) A custom android bootanimation (specify a file path, or 'default' to use the stock animation)
# android.bootanimation = default
# (str) Filename of a custom bootlog to display while booting (boot_progress in the manifest)
# android.bootlog =
# (list) Opaque data to pass to the bootstrap
# bootstrap =
# (str) Path to a custom whitelist file
# whitelist =
# (str) Path to a custom blacklist file
# blacklist =
# (list) List of Java .jar files to add to the libs so that pyjnius can access
# android.add_jars = foo.jar,bar.jar
# (list) List of Java .aar files to add to the libs.
# android.add_aars = foo.aar,bar.aar
# (list) Gradle dependencies to add (currently for android only)
# android.gradle_dependencies =
# (str) Path to the project directory to use (if not the current directory)
# android.project_dir = .
# (str) Path to the Android SDK directory (if empty, it will be automatically downloaded)
# android.sdk_path =
# (str) Path to the Android NDK directory (if empty, it will be automatically downloaded)
# android.ndk_path =
# (str) Path to a custom Android sources directory
# android.sources =
# (list) List of additional Java source folders to include
# android.java_source_dirs =
# (list) List of additional C/C++ source folders to include (will be compiled with the NDK)
# android.ndk_source_dirs =
# (list) List of additional Java classes to include from the jar files
# android.add_jars_classes = com.android.billingclient.api.*
# (list) List of obfuscated modules
# obfuscate =
# (str) The directory in which to place the cache
# ccache_dir = .ccache
# (bool) Use prebuild python instead of compiling it (if available)
# use_pth = true
# (bool) Show warning when adding Python modules with pip
# warn_on_pip_install = true
# (str) Path to a custom prebuilt python
# prebuilt_path =
# (str) Path to a custom prebuild python include path
# prebuilt_includes =
# (str) Path to a custom prebuild python libs path
# prebuilt_libs =
# (list) List of include directories to use with the prebuilt python
# prebuild_includes =
# (list) List of library directories to use with the prebuilt python
# prebuild_libs =
# (bool) If the application should be fullscreen or not
fullscreen = 0
# (str) Presplash of the application
# presplash.filename = %(source.dir)s/data/presplash.png
# (str) Icon of the application
# icon.filename = %(source.dir)s/data/icon.png
# (str) Supported orientation (one of landscape, sensorLandscape, portrait or all)
orientation = portrait
# (bool) Indicate if the application should be in fullscreen or not
fullscreen = 0
# (bool) Enable or disable the cursor
# cursor = 1
# (str) Permissions
# android.permissions = INTERNET
# (str) Services
# android.services =
# (str) Application meta-data to include/exclude
# android.meta_data =
# (str) Launch mode (singleInstance, singleTask, etc)
# android.launch_mode = standard
# (bool) If the application should be hidden on launch
# android.hide_app_window = False
# (str) If the application should be resizable or not
# resizable = False
# (bool) If the application should be able to receive notifications
# android.allow_notifications = True
# (str) If the application should be able to receive notifications
# android.notification_icon =
# (bool) If the application should be able to receive notifications
# android.notification_never_sleeps = False
# (str) Whether to copy library instead of making a libpymodules.so
# android.copy_libs = 1
# (list) List of Java .jar files to add to the libs so that pyjnius can access
# android.add_jars = foo.jar,bar.jar
# (list) List of Java .aar files to add to the libs.
# android.add_aars = foo.aar,bar.aar
# (list) Gradle dependencies to add (currently for android only)
# android.gradle_dependencies =
# (list) List of Android assets to copy into the APK. Maps directly to the `source` argument of the `android_new_project.py` script.
# android.assets =
# (str) Android logcat filters to use
# android.logcat_filters = *:S python:D
# (bool) Whether to use the blacklisted packages
# android.blacklistedsdk = False
# (str) How to compile the python code, can be one of (python2, python3, none)
# python_version = 2
# (str) The backend to use for the python interpreter
# backend = sdl2
# (str) Path to a custom entry point, relative to the buildozer.spec file
# entrypoint =
# (list) Path to a custom kivy widget directory (relative to this file)
# widget =
# (list) Path to a custom source directory (relative to this file)
# source.include_exts = py,png,jpg,kv,atlas
# (list) Path to a custom source directory (relative to this file)
# source.exclude_exts = spec
# (list) List of inclusions using pattern matching
# include_patterns =
# (list) List of exclusions using pattern matching
# exclude_patterns =
# (str) Application versioning (method 1)
# version = 0.1
# (str) Application versioning (method 2)
# version.regex = __version__ = ['"](.*)['"]
# version.filename = %(source.dir)s/main.py
# (list) List of directory path (relative to the buildozer.spec file) to search for anything source-like (e.g. html, images, etc.)
# source_dirs =
# (list) List of individual files to copy to the target app. Useful for legal stuff.
# copy_files =
# (str) Application name
# name = myapp
# (str) Domain of the application (for android)
# domain = org.myapp
# (str) Bundle identifier of the application (for iOS)
# ios.bundle_identifier = org.myapp.myidentifier
# (str) Title of the application (for iOS)
# ios.title = My Application
# (bool) Enable the debug panel
# debug = False
# (str) Path to a custom icon
# icon.filename = %(source.dir)s/data/icon.png
```
在buildozer.spec文件中,我们需要指定应用程序名称、包名、版本号、依赖项等信息。
接下来,在项目根目录下执行以下命令:
```
$ buildozer android debug
```
该命令将使用buildozer.spec文件中指定的信息,构建一个名为myapp-0.1-debug.apk的APK文件。
最后,我们可以将该APK文件安装到Android设备上,并运行我们的Python应用程序。
总结
Python作为一种高级编程语言,使用广泛。如果我们想要将Python应用程序打包成Android APK文件,就需要使用一些特殊的工具,如Buildozer或Kivy等。在打包之前,我们需要将Python解释器嵌入到APK文件中,并将Python代码编译为本地库。通过以上步骤,我们可以成功地将Python应用程序打包成Android APK文件,并在Android设备上运行。